
| Home | ebay shop | how to upgrade | why upgrade laptop |
How to upgrade laptop processors ?
just some quick guide to help with installation the new processor.
always handle with great care. The CPU die is fragile.
Good news is, it take less time to do the actual installation than reading the instruction.
1. do not over tighten the cpu socket screw. Too much pressure will break the CPU die.
2. buy a good thermal paste to help with cooling. we supply a basic thermal paste to get you started with.
3. any question just drop us an email. we are always here to help askmonkey@live.co.uk
Installation guide for notebook processors from Intel |
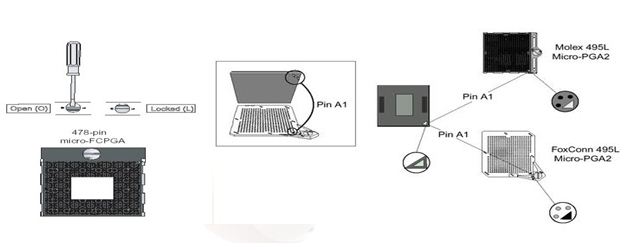
Important Instructions 1. Make sure that your system can accommodate the mobile Intel® processor that you want to install. Check formotherboard, BIOS, and thermal compatibility, contacting the vendor if necessary. 2. Obtain access to your processor socket as described in the documentation for your system. 3. If the cooling solution prevents you from accessing the processor socket, you may need to remove it. Instructions on how to remove your cooling solution should be provided in the documentation that came with the system. 4. To uninstall the current processor, use a screwdriver to disengage (open) the socket actuator, as shown in Figure 1 below. (The most commonly used sockets are Molex* or FoxConn* sockets, so they are used in the illustrations below.) The socket actuator should open after only a half turn or so, and you should then be able to remove the processor with your fingers.
Figure 1: Disengaging the Socket Actuator Figure 2 : socket alignment
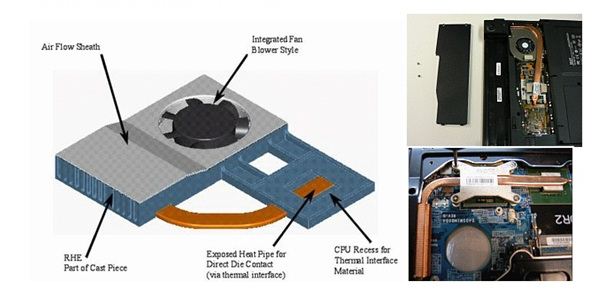
5. Using the method shown in Figure 2, place the new processor into the socket. Align the processor's pin A1 with the arrow on the Micro-PGA2 socket. The pin A1 of the processor is identified with an embroidered corner and the pi10n A1 of the socket is identified with a small arrow. If the processor does not drop completely into the socket, turn the actuator until the processor drops completely in. 6. While gently holding the processor down with your finger, secure the processor in the socket by closing the socket actuator with a screwdriver (See Figure 1). 7. Reattach the cooling system, and reassemble the system per documentation that came with the system. Thermal Solution (Cooling System) Examples:
|

Enjoy your day! any question drop a email to lee@laptopmonkey.co.uk